简单的移动
在本例中我们将进行简单的移动设置:
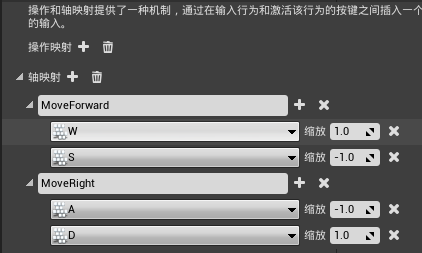
我们首先先在项目设置中设置我们的输入移动轴的定义,如下图:
然后我们需要创建一个Pawn类,命名为MyPawn,在MyPawn.h中,我们写入以下声明:
    public:
        // 虚拟根组件
        UPROPERTY(VisibleAnywhere, BlueprintReadOnly, Category = Camera)
            USceneComponent* OurVisibleComponent;
        // 静态模型组件
        UPROPERTY(VisibleAnywhere, BlueprintReadOnly, Category = Camera)
            UStaticMeshComponent* StaticMesh;
        // 摄像机手臂
        UPROPERTY(VisibleAnywhere, BlueprintReadOnly, Category = Camera)
            class USpringArmComponent* CameraBoom;
        // 摄像机组件
        UPROPERTY(VisibleAnywhere, BlueprintReadOnly, Category = Camera)
            class UCameraComponent* FollowCamera;

    private:
        // 当前的速度向量
        UPROPERTY(EditAnywhere)
            FVector CurrentVelocity;
        // 当前的速度值
        UPROPERTY(EditAnywhere)
            float MaxSpeed;

    private:
        // 前后移动的函数,由InputComponent绑定
        void MoveForward(float value);
        // 左右移动的函数,由InputComponent绑定
        void MoveRight(float value);
在其MyPawn.cpp中,我们写入以下定义:
    // 构造函数
    AMyPawn::AMyPawn() {
        // 允许Tick函数运行
        PrimaryActorTick.bCanEverTick = true;
        // 实例化根组件并绑定
        OurVisibleComponent = CreateDefaultSubobject<USceneComponent>(TEXT("RootComponent"));
        RootComponent = OurVisibleComponent;
        // 实例化模型组件并绑定在根组件下
        StaticMesh = CreateDefaultSubobject<UStaticMeshComponent>(TEXT("StiticMesh"));
        StaticMesh->SetupAttachment(RootComponent);

        // 实例化摄像机手臂并绑定在根组件下
        CameraBoom = CreateDefaultSubobject<USpringArmComponent>(TEXT("CameraBoom"));
        CameraBoom->SetupAttachment(RootComponent);
        // 设置摄像机手臂的参数设置
        CameraBoom->TargetArmLength = 150.f;
        CameraBoom->TargetOffset = FVector(0.f, 0.f, 60.f);
        CameraBoom->SetRelativeLocation(FVector(0.f, 0.f, 90.f));

        // 实例化摄像机并绑定在摄像机手臂上
        FollowCamera = CreateDefaultSubobject<UCameraComponent>(TEXT("FollowCamera"));
        FollowCamera->SetupAttachment(CameraBoom, USpringArmComponent::SocketName);
        // 摄像机的参数设置
        FollowCamera->AddLocalOffset(FVector(0.f, 0.f, 60.f));
        FollowCamera->SetRelativeRotation(FRotator(-45.0f, 0.0f, 0.0f));

        // 初始化速度向量和速度的值
        CurrentVelocity = FVector(0);
        MaxSpeed = 100.f;
        // 设置为Player0,即为当前玩家控制的物体
        AutoPossessPlayer = EAutoReceiveInput::Player0;
    }

    // 前后移动函数
    void AMyPawn::MoveForward(float value) {
        // 通过轴映射传入的值判断方向的前后,并设置当前状态下速度的向量
        CurrentVelocity.X = value * MaxSpeed;
    }

    // 左右移动的函数
    void AMyPawn::MoveRight(float value) {
        // 通过轴映射传入的值判断方向的左右,并设置当前状态下速度的向量
        CurrentVelocity.Y = value * MaxSpeed;
    }

    // 绑定输入函数
    void AMyPawn::SetupPlayerInputComponent(UInputComponent* PlayerInputComponent) {
        Super::SetupPlayerInputComponent(PlayerInputComponent);
        // 绑定轴映射对应的函数
        PlayerInputComponent->BindAxis("MoveForward", this, &AMyPawn::MoveForward);
        PlayerInputComponent->BindAxis("MoveRight", this, &AMyPawn::MoveRight);
    }

    // 每帧运行的函数Tick,DeltaTime为时间
    void AMyPawn::Tick(float DeltaTime) {
        Super::Tick(DeltaTime);
        // 定义新的位置坐标,速度乘以时间即为位移,用当位置加上位移量,即为移动后的位置
        FVector NewLocation = GetActorLocation() + CurrentVelocity * DeltaTime;
        // 设置新的位置
        SetActorLocation(NewLocation);
    }
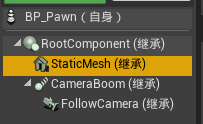
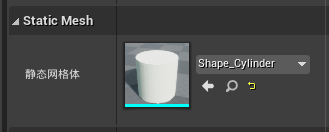
编译后,我们继承于我们的MyPawn新建一个蓝图类,命名为BP_Pawn,打开并指定我们BP_Pawn蓝图,选中StaticMesh组件,并绑定StiticMesh组件的模型,如下图:
然后我们编译保存,运行,我们按下W,S,A,D,就会发现我们的Pawn进行了最简单的移动。但是我们发现,我们拖入物体的时候如果对物体进行了旋转,那么物体的移动将会发生错乱。
因为这种移动方式是以世界坐标为基准,当物体进行转向之后,物体自身的X轴于世界坐标的X轴不对应,换句话说,指向的方向不一样,而我们上述的移动以世界坐标为基准,那么这种移动方式将会出错,若需要使用物体自身坐标为基准进行移动,那么我们需要做以下修改:
    在MyPawm.h中:
    public:
        // 箭头组件
        UPROPERTY(EditAnywhere)
            class UArrowComponent* ArrowComponent;
        /*
            这个组件特别重要,如果不声明不定义,我们的Pawn将无法知道
            GetActorForwardVector这个向量的方向,从而无法知道正方向,
            这个组件的作用就是定义这个物体的正方向
        */

    在MyPawm.cpp中:
    构造函数加入ArrowComponent组件的实例化
    ArrowComponent->CreateDefaultSubobject<UArrowComponent>(TEXT("ArrowComponent"));
    ArrowComponent->SetupAttachment(RootComponent);

    // 前后移动函数
    void AMyPawn::MoveForward(float value) {
        // 获取物体自身的向前方向的向量,乘于是否反向和速度,即可获得向前后移动的方向
        CurrentVelocity = GetActorForwardVector() * value * MaxSpeed;
    }

    // 左右移动的函数
    void AMyPawn::MoveRight(float value) {
        // 获取物体自身的向右方向的向量,乘于是否反向和速度,即可获得向左右移动的方向
        CurrentVelocity = GetActorRightVector() * value * MaxSpeed;
    }
通过以上的方式,我们就完成了简单的移动,并且物体无论如何转向,移动的方向都不会出错。